

Search the Community
Showing results for tags 'tutorial'.
Found 2 results
-
can you make a like 1 or 2 hour long video showing every single thing about building starships and thsi kind of stuff?? like everyhting.Exactly what does a core unit do, and what each of its sizes do, every thing that is used on starsips, like flappers, adjusters, fuel tanks, engines, everything and in every of its size( i think there are sizes like s, xs sm, l, xl) .show how to make a starship that goes outside the atmosphere, how to make it go as fast as possible, the best fuel, how to amek a base - starship, you know make a video abotu everything about starships and flying things.Every single thing.
-
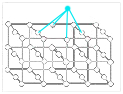
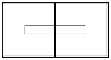
Tutorial: Voxelmancy Essentials This tutorial was made for Landmark. I didn't make the tutorial or play the game but, since it's based on the same technology, we can assume that it will work pretty much the same. It starts with the very basics and ends with some more advanced concepts. Whether or not you have already tried Dual Universe, this tutorial should be able to help you to understand this awesome (but very difficult to master) technology which is the Voxel. As a voxel beginner, I think I am not the only one who yelled at these crazy little voxels, "WTF happened?! I didn't ask you to do that!" The Inner Space of Voxelmancy Voxel Characteristics First of all…and this might hurt your brain a bit…a voxel is NOT a shape. It’s not the 1x1x1 cube shape you add with the smallest ADD brush. Actually, a voxel is a point. The different points (voxels) are connected to each other by lines (vectors). Those vectors form the outlines of the “cubes” that you see in the world when you use the ADD brush. (In other words, it takes many voxels to add enough vectors to make a shape.) When you use the building tools to change the shape of the cubes you see in the world, what you’re actually doing is dragging one (or more) of those voxel points into a new location…and then all those connecting lines move too, thus changing the outline of the shapes you see. There are only TWO voxel characteristics that matter to builders. The position of the voxel The material applied to that voxel’s cube space Also, for the purposes of this document, there are only four terms that matter: Voxel : The point in space that is the end point of one or more vectors. Vector : Any line connecting two voxels together. Shape : Any collection of vectors that outline an area thus creating a contained shape. (The default shapes are cubes, but voxels are easily moved around to create almost any shape. See below.) Cube space: In game terms, the natural "cube space" around a voxel is the same volume of space used by the ADD brush when you place a 1x1x1 cube into the world. Voxels *usually* live within their cube space, but can also comfortably live outside of it. However, the voxel is *always* associated with that cube space. What data is in a voxel? Imagine a grid of dots. (Each dot is a voxel.) Now imagine that each of those dots is connected to its neighboring dots by lines (vectors). Now, stack that up so that it’s in three-space. Voila. You have a decent representation of the voxel points in their natural “healed” cube-like state. NOTE: The positions of the voxels, in the rigid formation shown above, is the natural “healed” state of the voxels. The resulting shapes created by the vectors connecting them are what we normally see as “cubes” (and which, erroneously, we all have been calling voxels even though those shapes are actually composed of voxels instead.) When you move one of the voxels, the vectors connected to it also move. Thus, you change the shape of any cube seen as soon as you move a voxel. So just remember…everything is connected. You can’t move one thing without moving another. All the different welding, recopying, and smoothing tricks you may hear about are just different techniques to get these dots to end up in positions that make cool shapes. Last but not least: Cube space. The world is gridded out into cube space. (NOTE: Cube space is the same size as the smallest ADD brush when in cube mode.) By default, voxels live along the edges/corners of these cube spaces and the resulting vectors connecting them look like cubes. Normally, voxels need to stay within their cube space. However, there are building techniques that let a voxel wander out of its normal cube space. This is how shapes that are bigger than a cube are created. Voxels can also be smashed down into the center of that cube space, which allows the creation of smaller shapes as well. Roaming vectors let voxels wander WAY outside their normal cube space, but that gets pretty hairy to explain so we’ll discuss it some other time. What Material is on the Voxel? Material, in this case, is the material you chose from the Element Tray. (Example: Red Lumicite is a material. So is Hammered Gold or Raw Iron.) When a material is specified for a voxel, that changes its appearance in the world. That’s it. There’s only two special cases that might not be immediately obvious: Air. Yes, air is a material. Air voxels act *exactly* like regular voxels. They are just painted with a 100% transparent material, which is air. Default terrain. Everything in the world that has notbeen changed by a player is designated as “default terrain”. It has less data than a user-changed voxel so that we can optimize the heck out of stuff that players haven’t changed. The important characteristic about this default terrain is that it cannot be copied. (Its data structure is simpler and doesn’t have all the dots/vertices described earlier.) The other important thing to remember is that HEALing a voxel returns it to this “default terrain” material. And that’s why you can do nifty stuff with healed earth. These latter two special cases (Air and Default Terrain) cannot be directly selected with the selection tool. So the only way you can “grab” them is by also grabbing another nearby shape that’s painted with any of the other materials in the game. Side Note: What is a Roaming Vector? When we added Roaming Vectors to the game (6/26/2014), we increased the precision of lines and shapes quite a lot. This was done by “borrowing” nearby voxels and letting them “roam” outside of their normally allowed cube space. This means that nearby shapes sacrifice some of their own definition so that another shape can get one or more extra voxels added to it, thus providing more possible vectors, which enables that shape to have more detail. Pasting Dominance There is one thing to keep in mind as we go through the rest of this doc. Any item that you are pasting into the game is dominant. All the voxels within that copied area will keep their relative positions. This means that any shapes nearby are likely to change shape slightly as their voxels reconnect to these new voxels, and the vectors connecting them are changed. This “dominance factor” can be very useful when fixing any warpage that occurs, because any current data is overwritten by a paste. That lets you “re-weld” voxels and vectors by pasting in small bits that are the desired shape. Voxelmancy Techniques Okay. Now let’s talk about the various building techniques the community is using. Micro-shapes & Anti-shapes NOTE: Players have been calling them microvoxels and antivoxels, but that makes this discussion harder to follow when talking about voxels in conjunction with these shapes, so we’ll refer to the microvoxels as micro-shapes, and antivoxels as anti-shapes. (Sorry for the switch.) Both of these kinds of shapes are really just normal shapes that appear to be different. (It’s still useful to give them names for easy reference, but the point is…they’re still just normal shapes composed of voxels and vectors.) When you smooth a regular shape down into a micro-shape, you’re essentially just taking all the voxels the cube was composed of and squashing them down toward each other so that the resulting shape is a very small cube. Side note: Just to expand your mind, you’re also enlarging the air cubes around your brand new micro-shapes because you’re dragging those connected voxels away from the center of those shapes. Right? Everything is connected. Still, it’s cool, right? That voxel *looks* smaller and that make it useful for lots of building stuff. So what’s an Anti-shape? It’s exactly the same thing as a “micro-shape”. But its material is “air”. So it’s (currently) tricky to make, but it behaves in all other respects exactly as a smoothed-down (micro)shape. You just can’t see it or select it directly, because it’s made of air. Why do micro-shapes warp other nearby shapes? Remember how the voxels in a micro-shape are squished toward the center? Well, when you copy that micro-shape, you are really selecting the positions for the voxels that constitute that micro-shape. When you copy that shape into place near another existing shape, the vectors of the existing shapes are forced to attach to the voxels in your micro-shape. The game knows that what you *want* is for the thing you copied to paste as true as it can, so it connects the vectors from other nearby shapes toward the voxels you smashed into the center of your shape and this can cause warpage on the neighboring shapes. Make sense? Again, everything is connected. “Strings” So now let’s paste several of those new micro-shapes in a row, one cube space apart from each other. What happens? They stretch into strings! So cool! But no, that’s only what it looks like. What’s actually happening is that you pasted one micro-shape down (composed of a bunch of voxels and vectors) and then you copied another identical micro-shape in the cube space next to it. When you did that, the vectors from the previously pasted MV stretch out to connect to the voxels in the new one you pasted, and the resulting shape looks like a line. (Remember, the last shape pasted is dominant and everything else warps to it.) There is a convoluted process that force the end points of the string to align to the normal voxel borders. This technique creates “Antivoxel strings” and is Example 4 in the section below. Warping vs Non-Warping Shapes There’s a bunch of techniques designed to create objects that don’t warp neighboring shapes, but ultimately, there is only ONE way to avoid warping. That way is to ensure that the voxels in the shape you are pasting are aligned in such a way that they don’t cause the vectors of a neighboring voxel to move. That’s it. Just don’t make the vectors move and your shapes won’t warp. To make that seem simpler, here’s a few images. These images don’t show all the voxels. They show the shape instead and the normal “cube space” that the voxels for that shape live within. Ex 1: Micro/Anti voxel Regular “microvoxel” or “antivoxel”: This shape lives in the very center of its normal cube space. It will warp EVERYTHING IT TOUCHES because any neighboring voxel will extend its vectors out to reach the voxels in your micro-shape. Ex 2: Microvoxel strings Any “string” that is created by pasting two of these centered MVs together will still cause warpage everywhere it touches because the end points of that string are in the center of the cube spaces they represent. Ex 3: Any shape with a “normal border” flat edge This shape would not cause warpage *if* it is pasted onto something along its bottom side. (Example: If you pasted it onto a flat floor.) It would cause warpage if it was situated next to any shape above, or to the left/right of the shape, because those neighboring vectors would be forced to extend outward to connect. Ex 4: Antivoxel strings This is the shape that many people call an “AV string”. This is a useful shape because it still looks like a thin bar, but its ends are exactly at the “normal” cube space border and is in the center of the shape. Because it’s situated properly, any normal cube connected to either end of this string will not cause warpage of the block it’s touching. NOTE: Since the Smoothing tool change on 6/18/2014, it’s been possible to make these strings directly by making a column of 1x1 cubes and then smoothing it 3 or 4 times. Copy the middle smoothed “strings” that you see and the end points will match up to the cube space on the top and bottom. So What’s a MegaShape? Honestly, it’s just the exact opposite of a microvoxel or antivoxel. Players have been calling this a Megavoxel. (And again, for the purposes of this document, we’re going to start calling this a “Megashape” instead to avoid conflict with “voxel” conversations.) Instead of crushing the voxels in your shape down toward the center, you’re stretching them outside the normal cube space borders of your voxel instead. (In other words, you’re making all the neighboring air voxels smaller so that your current voxel can seem bigger.) That’s it. But the shapes are still useful because they create the appearance of behavior that you normally can’t achieve. So how on earth do you go about stretching the voxels of a shape outward? Answer: You don’t really. Instead, what you do is you crush in the voxels of a neighboring shape, thus dragging the voxels outward in the shape you want to enlarge. That’s why people create a megashape by pasting micro-shapes nearby. They are forcing the voxels to drag outward toward those micro-shapes. Warpage in General Isn’t it annoying that you can create a really cool shape, it looks totally awesome, but then it deforms the heck out of stuff when you paste it near anything? Well, the truth is…you’re just *seeing* the warpage for the first time when you paste it in next to the new shape. That same warpage was occurring originally also. You just couldn’t see it because when you made the shape, it was surrounded by air. Those nearby air shapes *did* warp, but you couldn't see them. Voxels always connect to other voxels via vectors. When one voxel gets dragged outward or inward, it tends to drag neighboring voxels along with it slightly to smooth out the “curve” of a voxel face as much as possible. And that’s just about it. But it’s happening on EVERY voxel all the time every time you smooth shapes or paste shapes or even when you remove shapes. Side note: Why does removing a shape sometimes warp neighboring shapes? Because when you delete your current shape, you're replacing it with a perfect cube shape isntead ( painted with air material). This does exactly the same thing as if you had just pasted in a perfect cube voxel of any other material. If the voxel you replaced wasn’t a perfect cube, this can cause vectors to shift and the shape will change in that case. Inlay Technique The last major building technique to cover here is the “Inlay Technique”. This is probably the coolest trick that any builder can learn, as it allows you to do a ton of curvalicious detail that's not possible to do otherwise. We won’t take the time to describe applications of this (there are many player tutorials), but here are some details of how the process works: Step 1: Select any-sized area of non-air shapes as long as that area is only one cube space thick. Step 2: Take any other area of any design and paste it once above your object from Step 1, and then once again below it. This forces the “sandwiched” object to realign its vectors and voxel positions to match the object that was pasted above and below. Why? Because the game is trying to preserve the data of the object that you are pasting. It’s NOT trying to preserve the shape you created in Step 1. Thus, the sandwiched object in Step 1 gets all its voxels realigned to match the object above and below and when you copy that slice out of the sandwich, you’ll see that it has been transformed accordingly. Make sense? Sources : Smokejumper, forums.daybreakgames.com


- 8 replies
-
- 12
-

-
- voxelmancy
- tutorial
- (and 1 more)
