NQ-Deckard
-
Posts
239 -
Joined
-
Last visited
Everything posted by NQ-Deckard
-
 Hello Noveans! The announcement can be found here. And the video can be found here. We would love to hear your feedback, so discuss away!
 -
Looking to quench your thirst for quanta? Today we are launching update 0.25.8 "Hermes", which is codenamed after the messenger of the Greek gods, as a reference to the newly-introduced Mission System. "Hermes" marks the final phase of the 0.25 update and introduces three features that will fatten up your wallet in no time. The Mission System and Job Forum were the topics of this devblog. Challenges were mentioned in The Future of DU: Finding the Fun. Hauling Missions - Your Alioth hostess with the mostess, Aphelia, or other players will request delivery of goods from Point A to Point B. You’ll be handsomely rewarded for successfully completing the mission. These missions adhere to a particular list of parameters that includes specific locations, time limits, and collateral. The Job Forum - Earn some cold, hard quanta by accepting freeform contracts from fellow players to perform a service, such as fuel deliveries or providing security. Challenges - This repeatable, solo-player activity takes place outside the persistent game world, making it a perfect opportunity for new players to get a feel for maneuvering a ship without compromising a “real” one. More experienced pilots will also find challenges fun and financially rewarding. Enter a designated VR surrogate station, complete the objectives, and watch your wallet swell with pride. Note: Additional challenge types will be added over time. Watch this video for a closer look. Last but not least, you will notice some spiffy new VFX thanks to our integration of PopcornFX. We’ll reveal more about this in an upcoming article. Full patch notes are conveniently available in the launcher so you can read them as you update the client, or they can be found here on the forum. We cordially invite you to join the discussion where you share your feedback about the Hermes release.

-
NQ suggests buffing engines, your thoughts?
NQ-Deckard replied to ELX987's topic in General Discussions
Or you could always ask someone who is more confident with Lua to either create it for you, or show you how to do it. We don't expect every player to be a programmer, artist, voxelmancer, industrialist, miner and pilot all at the same time. There is a community of players out there who all have different strengths, and I'm sure you can find a programmer you could ask or hire to help you implement what you would like. Similarly in the way you could ask or hire a builder to make you an amazing ship or an artist to make you a nice looking SVG logo. -
NQ suggests buffing engines, your thoughts?
NQ-Deckard replied to ELX987's topic in General Discussions
Hello everyone, I'm going to aim to answer a few of you here. But before doing so I just want to clear up that this was a hypothetical question from me and not something we necessarily have planned. As such please don't expect any sudden changes, however I have really enjoyed reading this thread and seeing the ongoing constructive discussion. Why no XL atmospheric engines? They will likely appear eventually when they are ready, however we don't have an ETA for that at this time. Producing assets for these takes time away from other tasks and are they are not currently the highest priority. We need the energy system to reduce this! Similar answer to the above in all honesty, it takes time to produce and we currently have other things prioritized. Fuel, Mass, Rockets and XS Lights Rockets and fuel is intended to not be light weight and moving it into space shouldn't be trivial, there are a number of other factors at play here that are simply from a balancing perspective and play a role in the wider gameplay. (No not the lights ?) This idea has been brought up, and indeed it would require some time to change and likely won't be soon. But is never the less an interesting thought. This is quite easily doable through a few engines tags and some minor lua changes. -
I'm going to kindly remind you to not reopen closed threads. ?
-
We’re pleased to announce that the first of a number of 0.25 updates has been deployed. As with the 0.24 updates, the full content of the 0.25 branch will be released incrementally. Features coming later include the Mission System and Challenges. This is an important patch that focuses on some of the performance and database storage improvements mentioned in The Future of Dual Universe: Under the Hood, the second of a three-part devblog series. The most significant elements of this update are: Voxel compression - We’ve implemented large, fundamental changes in how voxels are stored server-side, optimizing and improving player bandwidth usage going forward. Constructs LOD - Level of detail (LOD) improvements mean that ships and bases in the distance will now load and display a lower resolution version. This should improve framerate in some places and allow for faster loading times overall. We remain steadfast in our pledge to continue bringing performance improvements. Although this isn’t a “magic bullet” update that promises to fix everything in one fell swoop, many players should now enjoy a smoother performance. Full release notes are available in the launcher and on the forums.

-
We are indeed listening The repair units are not in a final state yet, improvements will come over time. Regarding the fuel related topic, I will feed back your idea to the team. ?
-
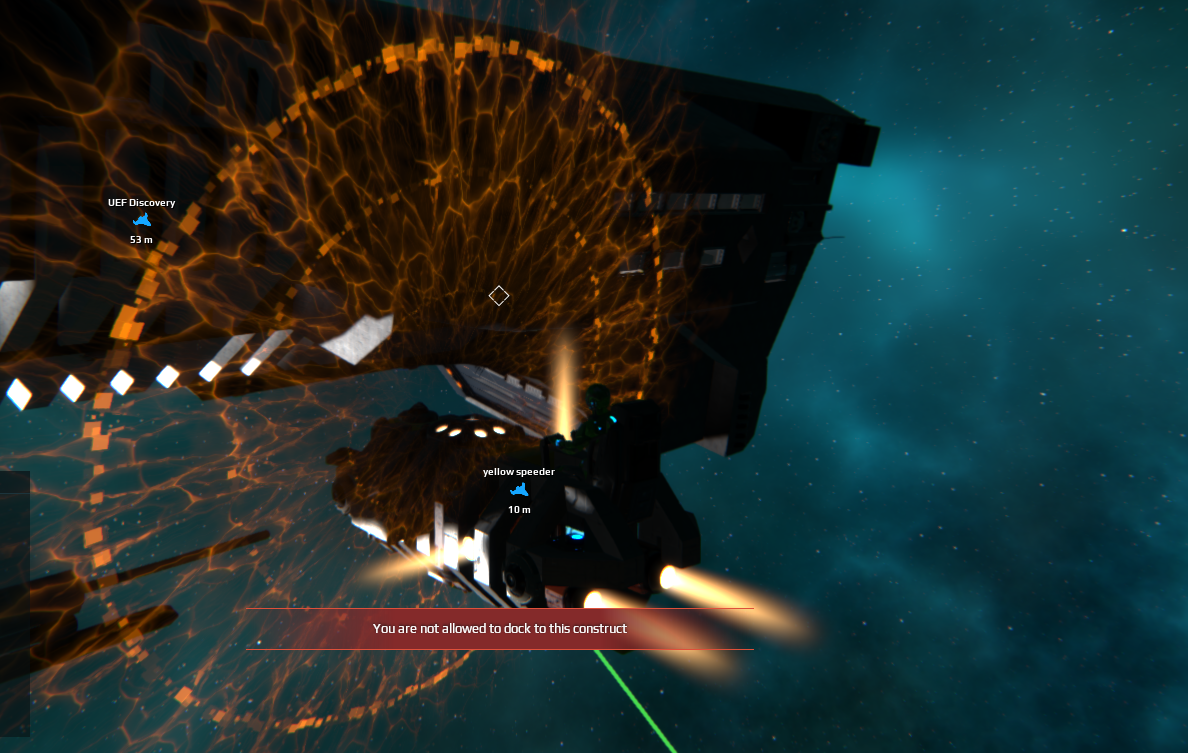
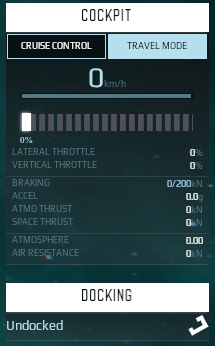
Discuss the Docking and Boarding changes below!
-
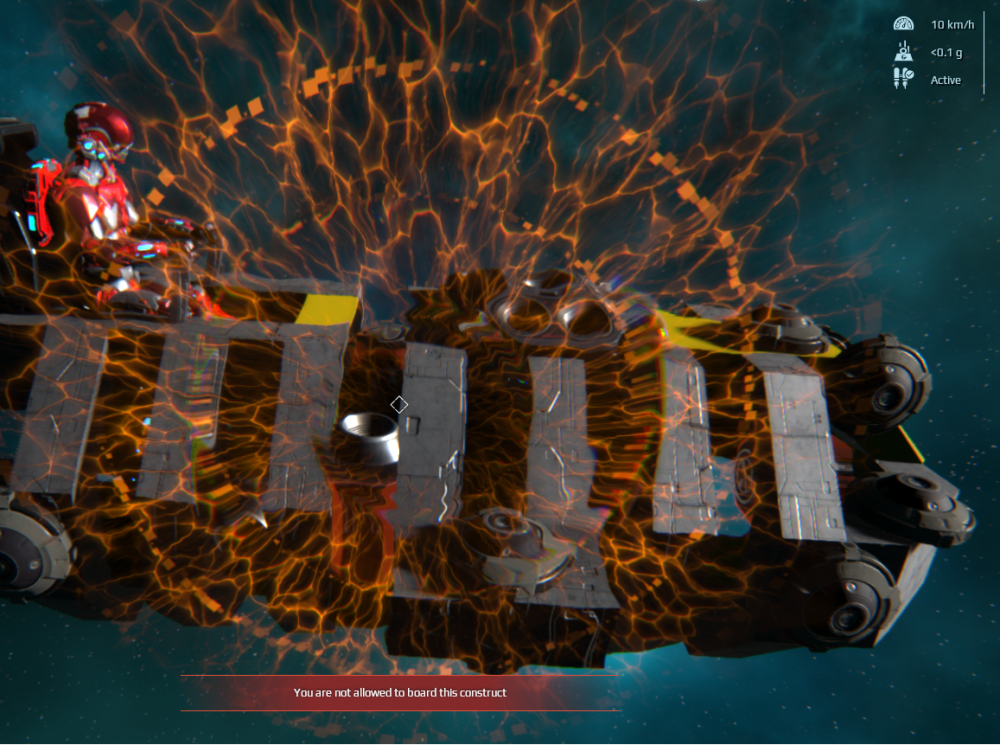
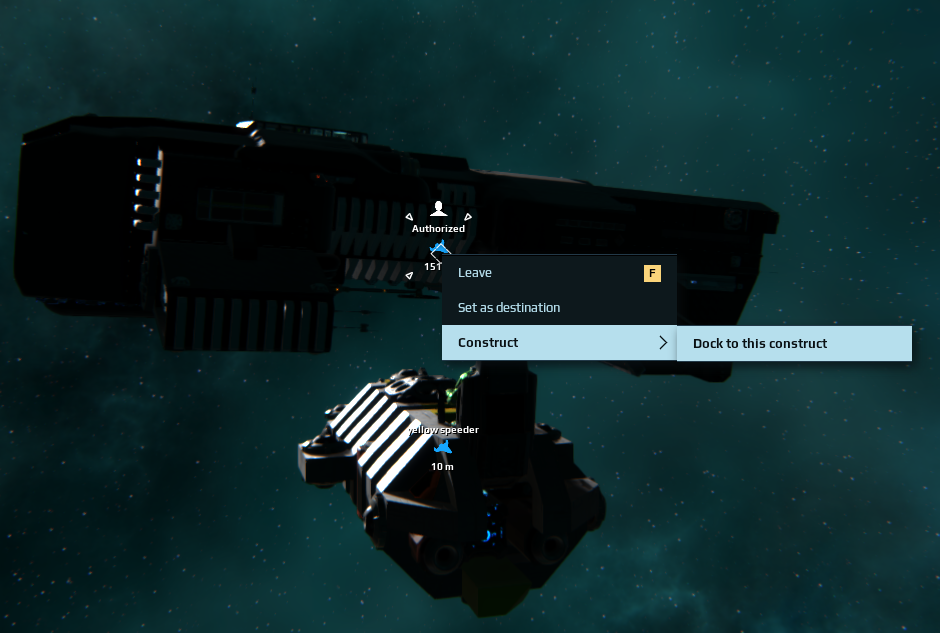
Space can be lonely, and, if some adages are to be believed, no one can hear you scream out there. You may want to bring along some friends, maybe not so much for the screaming but for sharing fuel and good times. That’s where docking and boarding comes in. Previously referred to with the blanket term “parenting”, breaking them off as boarding and docking clarifies what they are and what they do. Just as the name implies, boarding allows passengers to come aboard your ship. Docking makes it possible to have ships connected to other ships, even when both are moving. This boarding/docking relationship basically has the same functionality and behaviour as before but with the added benefit of rights management. In its original design, boarding or docking a construct was not consensual. Neither the player who owned the construct being boarded/docked nor the player whose construct was being attached to another could decline. They may not have even been aware it had happened in some cases, it simply occurred due to their proximity. This was a problem for a few reasons, most notably that it opened the door for bugs and exploits. In addition to negating those, revisiting the feature also gives us the opportunity to make it more intuitive and purposeful. ASSIGNING RIGHTS Owners can use the Rights & Duties Management System (RDMS) to assign Right to Board or Right to Dock to their constructs that will let others board or dock, or to forbid such requests. Dynamic constructs have the ability to move, as opposed to static constructs - like buildings - that are immobile. With the necessary rights, avatars will be able to board dynamic constructs, and smaller dynamic constructs (let’s call them shuttles) will be able to dock with bigger ones (aka carriers). When boarded or docked, the player or the shuttle moves with the carrier, and their mass is added to the carrier’s physics. A player or a shuttle will need to be near the carrier in order to board or dock, it can’t be done from a distance. The distance is commiserate with the size of the target vessel, the minimum distance being 32m and 128m being the maximum. BOARDING Players are able to board any inactive dynamic construct. This makes it possible for them to tour constructs on display in a marketplace or the like. The construct will go into the “active” state when the owner or someone else with piloting rights jumps into the driver’s seat, and unauthorized passengers will be automatically ejected. If a player enters a dynamic construct with the proper rights or when the construct is inactive, they will become boarded and can move freely around the construct. The UI display may look something like this: This is a sample of the UI that is still in progress If the construct is active and the player attempting to board does not have the necessary right to board, they will be repulsed. The effect is similar to hitting an impassable barrier with no damage taken. The UI display may look something like this: DOCKING Once shuttle pilots with the necessary rights are within range, they can manually dock to a carrier. This is done through a contextual menu that is accessed via right-click. The shuttle will then be invisibly tethered to the exterior of the carrier. Without that clearance, the shuttle will be repulsed. Authorized shuttle pilots will receive an opt-in confirmation to signal when they are within docking range. The “Docking” widget in the piloting UI informs the pilot of the shuttle when they are in docking range through this small open chain link icon. This is a sample of the UI report to show a shuttle’s docking status. PARENTING ADVICE The owner of the carrier is considered the parent, and those who are granted boarding or docking rights are children. Just as real-world moms and dads, construct owners can give their “kids” the old heave-ho when it’s time for them to leave the nest and fly solo. This is done in a Build Helper’s submenu where all boarded players and docked shuttles are listed. Buh-bye! Boarded avatars can be ejected at any time directly through the carrier’s Build Helper interface. This results in ejected players suddenly finding themselves adrift, possibly in deep space. Here, they have two options. Jetpack to a safe place. Depending on the distance, this could take quite a while; however, it’s safe (they can’t be attacked) and they will arrive with the inventory in their nanopack. The second option, suicide, will get them on terra firma faster, but they will lose whatever they were carrying. Probably a good idea to stay on the good side of the carrier captain to avoid being in this predicament. With a few simple clicks, the carrier pilot can easily de-dock shuttles, too. TAKE IT FOR A SPIN These changes will be featured in an upcoming release on the public test server (PTS). We highly encourage our community to explore it when it’s available, then let us know what you think about the ease of use and convenience. Until then, feel free to join the discussion on our forums.


-
[Guidelines] Public Test Server Feedback
NQ-Deckard replied to NQ-Nyzaltar's topic in Public Test Server Feedback
I'll have to look into that institute district teleporter. However yes, other than on Alioth (which has its teleporter at the dispenser institutes), you will find a small console with buttons that will teleport you to Market 1 of each major planet in the system, and also 3 platforms on the edge of the safe zone where you can build and experiment with ships in space and pvp. The location of this teleporter on Alioth is at: ::pos{0,2,29.2626,94.9228,289.0562} If you have further questions, don't hesitate to ask. -
[Guidelines] Public Test Server Feedback
NQ-Deckard replied to NQ-Nyzaltar's topic in Public Test Server Feedback
Hello @Bobbie, You can find a lot of the information for the PTS server in the first post in this thread and in the following posts: You can find the dispensers at a duplicate of the institute district near the Arkship on Alioth. (District 12) I will however add a short post with all the information regarding the PTS server in one place. -
Ah! That's for pointing that out. You can find a number of player made tutorials for Lua and such on the tutorials section of the website: https://www.dualuniverse.game/tutorials/lua-guide-to-doors As for json.encode() / json.decode(), they simply turn data objects in Lua into a text string and back. For example: -- This is a simple table in lua luaTable = { itemOne = 123, itemTwo = 456, itemThree = 789 } -- this converts that table into a text string jsonTable = json.encode(luaTable) -- this will print that text to the console system.print(jsonTable) -- Console output should be something like: {"itemOne": 123, "itemTwo": 456, "itemThree": 789} -- this will turn that text back into a useable table secondLuaTable = json.encode(jsonTable)
-
Hello HomerGAdams! There are actually 3 steps to the process of retrieving and processing the container information The container content is not loaded by default, first you will need to request the content through: container.acquireStorage() This is limited to 10 calls every 5 minutes, if you go over that it will trigger a cooldown. This call is not immediate and takes a (short) time to arrive. Once that data arrives and is available to use an event is triggered on the container slot called storageAcquired() You can simply set a filter on the container unit and it will be triggered everytime container.acquireStorage() has successfully returned results. Inside storageAcquired() you will now likely want to use jsonString = container.getItemsList() or alternatively deconstruct the JSON data directly: itemList = json.decode(container.getItemsList()) The item list will then be a numbered table containing the item slots in the container, and each entry will have the follow fields available to it: name, quantity, unitVolume, unitMass, type, class If you want a practical example to look at you can copy the following and use "Paste Lua Configuration from Clipboard" onto a programming board. {"slots":{"0":{"name":"container","type":{"events":[],"methods":[]}},"1":{"name":"screen","type":{"events":[],"methods":[]}},"2":{"name":"slot3","type":{"events":[],"methods":[]}},"3":{"name":"slot4","type":{"events":[],"methods":[]}},"4":{"name":"slot5","type":{"events":[],"methods":[]}},"5":{"name":"slot6","type":{"events":[],"methods":[]}},"6":{"name":"slot7","type":{"events":[],"methods":[]}},"7":{"name":"slot8","type":{"events":[],"methods":[]}},"8":{"name":"slot9","type":{"events":[],"methods":[]}},"9":{"name":"slot10","type":{"events":[],"methods":[]}},"-1":{"name":"unit","type":{"events":[],"methods":[]}},"-2":{"name":"system","type":{"events":[],"methods":[]}},"-3":{"name":"library","type":{"events":[],"methods":[]}}},"handlers":[{"code":"-- Event was fired so we now have the container content.\nitems = json.decode(container.getItemsList())\n\n-- Lets make an HTML table to display all the data.\nlocal html = [[\n<div class=\"bootstrap\" width=\"1vw\" height=\"1vh\">\n\t<table>\n\t\t<tr>\n\t\t\t<th>name</th>\n\t\t\t<th>quantity</th>\n\t\t\t<th>unitVolume</th>\n\t\t\t<th>unitMass</th>\n\t\t\t<th>type</th>\n\t\t\t<th>class</th>\n\t\t</tr>\n]] \n\n-- iterate over the container data and add the items to the table\nfor entry,itemData in ipairs(items) do\n html = html..[[\n\t\t<tr>\n\t\t\t<td>]]..itemData[\"name\"]..[[</td>\n\t\t\t<td>]]..itemData[\"quantity\"]..[[</td>\n\t\t\t<td>]]..itemData[\"unitVolume\"]..[[</td>\n\t\t\t<td>]]..itemData[\"unitMass\"]..[[</td>\n\t\t\t<td>]]..itemData[\"type\"]..[[</td>\n\t\t\t<td>]]..itemData[\"class\"]..[[</td>\n\t\t</tr>\n ]]\nend\n\n-- End the table\nhtml = html..[[\n\t</table>\n</div>\n]]\n\n-- Write to the screen\nscreen.setHTML(html)","filter":{"args":[],"signature":"storageAcquired()","slotKey":"0"},"key":"0"},{"code":"-- When the board starts up let the player know the data is being retrieved (This could be quick or slow)\nscreen.setHTML([[<div class=\"bootstrap\" style=\"font-size:5vw; \">Retrieving container data</div>]])\n\n-- Lets prepare an empty table for the data to go into\n-- This prevents other functions from receiving null until the data is retrieved.\nitems = {} \n\n-- Start a request for the container data \n-- this will trigger an event in the container slot when completed\n-- We can only do this 10 times per 5 minutes, or a cooldown will be triggered.\ncontainer.acquireStorage()","filter":{"args":[],"signature":"start()","slotKey":"-1"},"key":"1"}],"methods":[],"events":[]} I hope this helps answer your question, if not please do let me know NQ-Deckard
-
Lua Screen Units API Many of you have asked us to release more information about the workings of the Lua Screen Units. As such, you can now read the initial API information in the PTS Feedback forum in this post. Please bare in mind that this is a technical prototype, and many things such as UI, feedback, polish and features are not present at this time.
-
Lua Screen Units API and Instructions (Updated: 19/07/2021)
NQ-Deckard replied to NQ-Deckard's topic in General Discussions
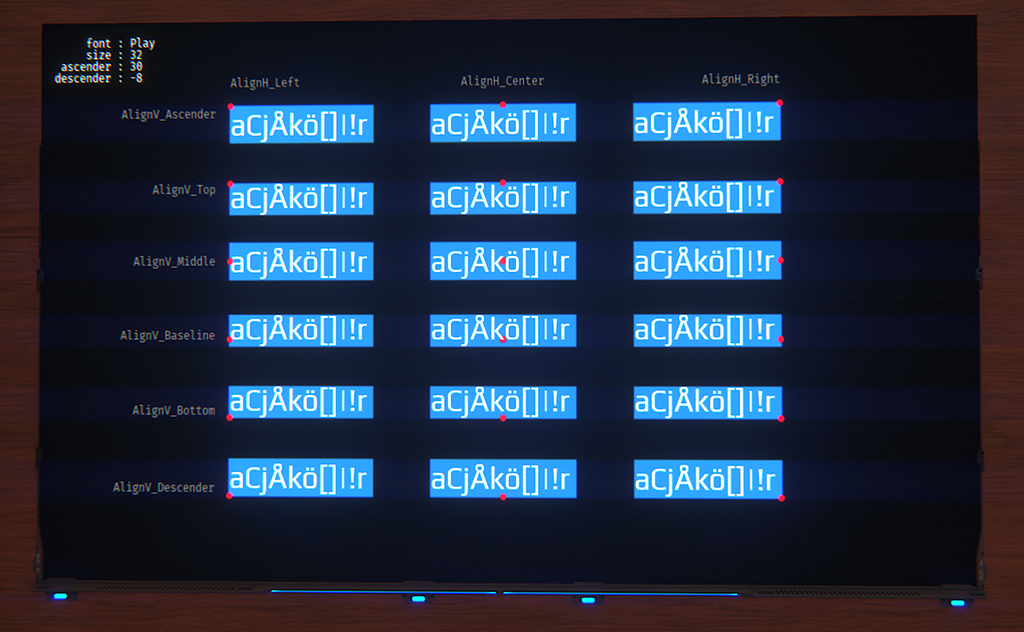
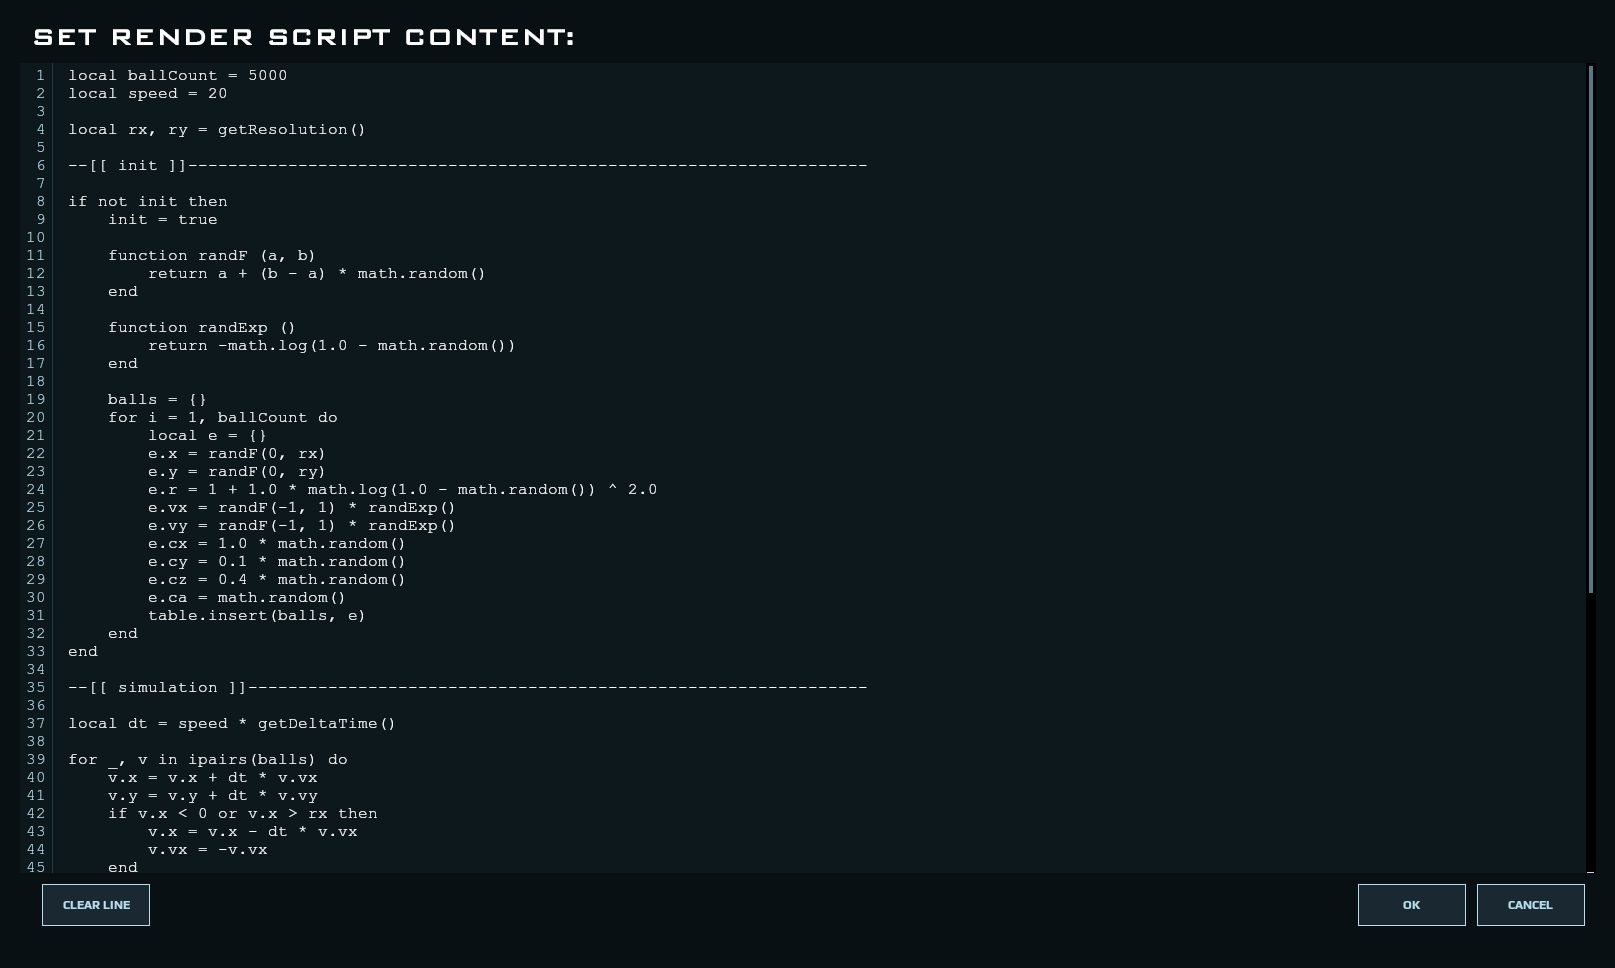
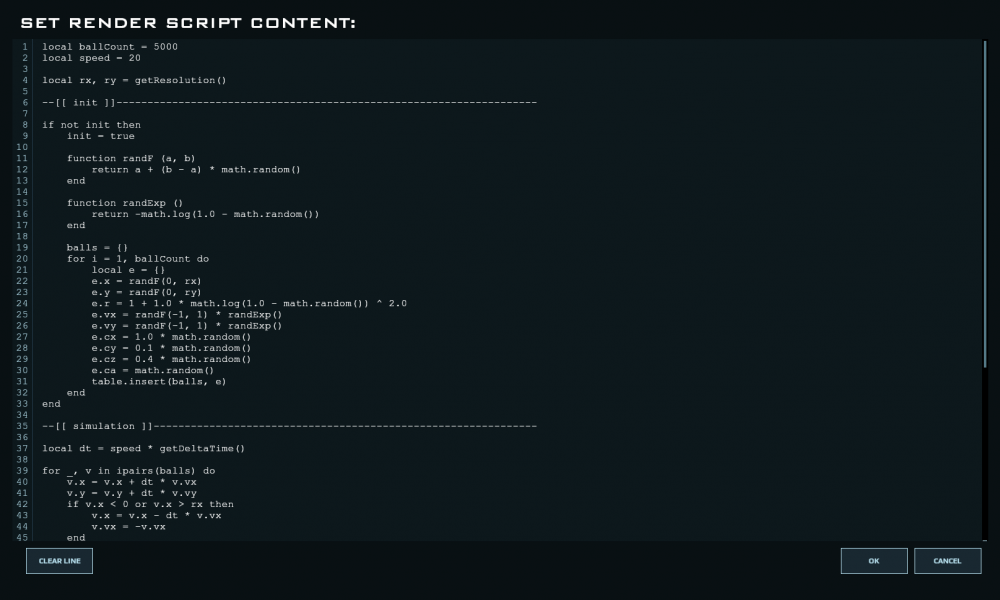
Sample Scripts (Advanced) These more advanced scripts demonstrate what can ultimately be achieved with this API. Perhaps they will inspire you a bit! Entropy Like the bouncy ball example, but fancier! local ballCount = 5000 local speed = 20 local rx, ry = getResolution() --[[ init ]]-------------------------------------------------------------------- if not init then init = true function randF (a, b) return a + (b - a) * math.random() end function randExp () return -math.log(1.0 - math.random()) end balls = {} for i = 1, ballCount do local e = {} e.x = randF(0, rx) e.y = randF(0, ry) e.r = 1 + 1.0 * math.log(1.0 - math.random()) ^ 2.0 e.vx = randF(-1, 1) * randExp() e.vy = randF(-1, 1) * randExp() e.cx = 1.0 * math.random() e.cy = 0.1 * math.random() e.cz = 0.4 * math.random() e.ca = math.random() table.insert(balls, e) end end --[[ simulation ]]-------------------------------------------------------------- local dt = speed * getDeltaTime() for _, v in ipairs(balls) do v.x = v.x + dt * v.vx v.y = v.y + dt * v.vy if v.x < 0 or v.x > rx then v.x = v.x - dt * v.vx v.vx = -v.vx end if v.y < 0 or v.y > ry then v.y = v.y - dt * v.vy v.vy = -v.vy end end --[[ rendering ]]--------------------------------------------------------------- local l = createLayer() -- render balls for _, e in ipairs(balls) do setNextFillColor(l, e.cx, e.cy, e.cz, e.ca) addCircle(l, e.x, e.y, e.r) end -- render title local font = loadFont('Play-Bold', 64) addText(l, font, '{{ E N T R O P Y }}', 32, ry - 32) requestAnimationFrame(1) -------------------------------------------------------------------------------- Radial Menu Practical example of how responsive UI elements could be designed, creates 3 radial menu's using the same function. Left: Example with transparency on the circle layer to demonstrate layering and the use of math to define the circle stroke. Top right: Example without transparency, drawn to a different scale. Bottom right: Example of a collapsible version saving screen real-estate and reducing rending costs while collapsed. (Only a dot is drawn while collapsed) -- Get screen resolution and center coordinates local resolutionX,resolutionY = getResolution() local centerX,centerY = resolutionX/2, resolutionY/2 -- Draw radial menu layers local triLayer = createLayer() local circleLayer = createLayer() local textLayer = createLayer() -- Define some helpers to convert degrees to radians local d2r = math.pi/180 -- Helper function to get distance of cursor from coordinates function getCursorDistance(x,y) local curX,curY = getCursor() curX = curX - x curY = curY - y return math.sqrt(curX^2+curY^2) end -- Helper function to check if cursor is inside a radial menu section function isCursorInside(radialCenterX,radialCenterY,radiusMin,radiusMax,degMin,degMax) local curX,curY = getCursor() curX = curX - radialCenterX curY = curY - radialCenterY local magnitude = getCursorDistance(radialCenterX,radialCenterY) local deg = math.atan(curY/curX)/d2r if curX < 0 then deg = deg + 180 end if curX > 0 and curY < 0 then deg = deg + 360 end if magnitude <= radiusMax and magnitude >= radiusMin and deg > degMin and deg < degMax then return true end end -- Define function that can draw a radial menu on demand function drawRadialMenu(posX,posY,radius,steps,hide,strokeAndCenterAlpha) -- Define default variables local posX = posX or centerX local posY = posY or centerY local radius = radius or 200 local steps = steps or 15 if hide ~= nil then hide = hide else hide = true end local strokeAndCenterAlpha = strokeAndCenterAlpha or 1 -- minimum of 4 segments steps = math.max(steps,4) -- work out the depth of the triangular facets along the circumferance and use it to determine the outer circle stroke width local aX,aY = radius*math.cos(0) , radius*math.sin(0) local bX,bY = radius*math.cos(((360/steps)*1)*d2r) , radius*math.sin(((360/steps)*1)*d2r) local stroke = math.min(-(radius-math.sqrt(((aX+bX)/2)^2+((aY+bY)/2)^2)),-3) if not hide or (hide and getCursorDistance(posX,posY) < (radius)) then -- Draw triangular segments local alpha = 0.5 for step=1,steps,1 do -- calculate the corners of the triangles on the radius local aX,aY = posX + (radius*math.cos(((360/steps)*(step-1))*d2r)) , posY + (radius*math.sin(((360/steps)*(step-1))*d2r)) local bX,bY = posX + (radius*math.cos(((360/steps)*step)*d2r)) , posY + (radius*math.sin(((360/steps)*step)*d2r)) -- call helper function to determine if cursor is inside the segment and change color if true if isCursorInside(posX,posY,radius/3,radius,((360/steps)*(step-1)),(360/steps)*step) then setNextFillColor(triLayer,1,1,1,1) -- create center number while the cursor is over a selection local font = loadFont('Montserrat', math.floor(radius/4)) setNextFillColor(textLayer, 1, 1, 1, 1) addText(textLayer, font,step, posX-((radius/12)*#tostring(step)), posY+math.floor(radius/12)) else setNextFillColor(triLayer,1,0,0,alpha + 0.5) end -- Draw the triangle based on pre-calculated coordinates and with the color now preset addTriangle(triLayer,posX,posY,aX,aY,bX,bY) -- flip the alpha between 1 and 0 for the next segment alpha = 0.5 - alpha end -- Create the outer stroke which should be a negative value so it overlaps the triangle facets setNextStrokeColor(circleLayer,0.5,0.5,1,strokeAndCenterAlpha) setNextFillColor(circleLayer,0,0,0,0) setNextStrokeWidth(circleLayer,stroke) addCircle(circleLayer,posX,posY,radius) -- Create the inner stroke and fill to create the "hole" in the center at 1/4th of the radius. setNextStrokeColor(circleLayer,0.5,0.5,1,strokeAndCenterAlpha) setNextFillColor(circleLayer,0,0,0,strokeAndCenterAlpha) setNextStrokeWidth(circleLayer,stroke) addCircle(circleLayer,posX,posY,radius/4) else -- Create a transparent dot to indicate its position while its hidden. setNextFillColor(circleLayer,0.5,0.5,1,0.2) addCircle(circleLayer,posX,posY,radius/4) end end -- Draw three examples -- Example 1 (large one on left) with transparency to demonstrate how the circular shape was achieved with the triangles. drawRadialMenu(resolutionX/3,centerY,200,6,false,0.5) -- Example 2 (Top right) Does not hide, shows the result without transparency drawRadialMenu((resolutionX/3)*2,resolutionY/3,100,8,false) -- Example 3 (Bottom right) Remains hidden and un-rendered until the cursor enters its area, reducing render cost by ~120000 while hidden. drawRadialMenu((resolutionX/3)*2,(resolutionY/3)*2,80,36) -- render cost profiler if true then local layer = createLayer() local font = loadFont('Play-Bold', 14) setNextFillColor(layer, 1, 1, 1, 1) addText(layer, font, string.format('render cost : %d / %d', getRenderCost(), getRenderCostMax()), 8, 16) end -- Request a refresh requestAnimationFrame(1) Text positioning Demonstration example of the various alignment points for text using Font Metrics and Text Align. local fontName = 'Play' local fontSize = 32 local font = loadFont(fontName, fontSize) local fontDebug = loadFont('FiraMono', 12) local back = createLayer() local layer = createLayer() local rx, ry = getResolution() local ascender, descender = getFontMetrics(font) local text = "??" frame = (frame or 0) + 1 setDefaultFillColor(layer, Shape_Text, 1, 1, 1, 1) setDefaultFillColor(layer, Shape_Circle, 1, 0, 0, 1) function drawTextBox (x, y, alignH, alignV) local w, h, ascent, descent = getTextBounds(font, text) if alignH == AlignH_Left then x = x elseif alignH == AlignH_Center then x = x - w/2 elseif alignH == AlignH_Right then x = x - w end if alignV == AlignV_Ascender then y = y h = ascender - descender elseif alignV == AlignV_Top then y = y elseif alignV == AlignV_Middle then h = ascender - descender y = y - h/2 elseif alignV == AlignV_Baseline then y = y - ascent elseif alignV == AlignV_Bottom then y = y - h elseif alignV == AlignV_Descender then h = ascender - descender y = y - h end setNextFillColor(back, 0.1, 0.5, 1.0, 1.0) setNextStrokeWidth(back, 1) addBox(back, x, y, w, h) end function main () if frame % 2 == 0 then text = "acemnor " else text = "aCjÅkö[]|!r " end -- display debug info about font if true then local infoLines = { string.format(" font : %s", fontName), string.format(" size : %d", fontSize), string.format(" ascender : %d", ascender), string.format("descender : %d", descender), } for i, line in ipairs(infoLines) do setNextTextAlign(layer, AlignH_Left, AlignV_Top) addText(layer, fontDebug, line, 16, 16 + (i - 1) * 12) end end local alignHs = { 'AlignH_Left', 'AlignH_Center', 'AlignH_Right', } local alignVs = { 'AlignV_Ascender', 'AlignV_Top', 'AlignV_Middle', 'AlignV_Baseline', 'AlignV_Bottom', 'AlignV_Descender', } -- draw text boxes with various alignments local sx = 300 local sy = 80 local x0 = rx/2 - sx * (#alignHs-1)/2 local y0 = ry/2 - sy * (#alignVs-1)/2 for y, alignVName in ipairs(alignVs) do for x, alignHName in ipairs(alignHs) do local px = x0 + sx * (x - 1) local py = y0 + sy * (y - 1) local alignV = _ENV[alignVName] local alignH = _ENV[alignHName] drawTextBox(px, py, alignH, alignV) setNextTextAlign(layer, alignH, alignV) addText(layer, font, text, px, py) addCircle(layer, px, py, 3) end end -- draw AlignH labels for x, alignH in ipairs(alignHs) do setNextTextAlign(layer, _ENV[alignH], AlignV_Descender) setNextFillColor(layer, 0.5, 0.5, 0.5, 1) addText(layer, fontDebug, alignH, x0 + (x - 1)*sx, y0 - 16) end -- draw AlignV labels for y, alignV in ipairs(alignVs) do setNextTextAlign(layer, AlignH_Right, _ENV[alignV]) setNextFillColor(layer, 0.5, 0.5, 0.5, 1) addText(layer, fontDebug, alignV, x0 - 16, y0 + (y - 1)*sy) end end if not isFontLoaded(font) then requestAnimationFrame(10) else main() requestAnimationFrame(120) end
- 6 replies
-
- 16
-

-
Lua Screen Units API and Instructions (Updated: 19/07/2021)
NQ-Deckard replied to NQ-Deckard's topic in General Discussions
Sample Scripts (Basic) The following scripts are intended to minimally demonstrate basic usage of render script. Checkerboard Creates a simple checkerboard pattern by covering the screen with rectangles of alternating color. local resX, resY = getResolution() local tilesX, tilesY = 32, 16 local tileW, tileH = resX / tilesX, resY / tilesY local layer = createLayer() for y = 0, tilesY - 1 do local color = y % 2 for x = 0, tilesX - 1 do if color == 0 then setNextFillColor(layer, 1, 1, 1, 1) else setNextFillColor(layer, 0, 0, 0, 1) end addBox(layer, x * tileW, y * tileH, tileW, tileH) color = (color + 1) % 2 end end Simple Text Draws some lines of text. local lines = { "Lua screen units are great!", "They can render lots of contents...", "even really smooth, complex animations!", "They're very fast.", "They're not as easy to use as HTML,", "...but once you get the hang of them...", "you'll be unstoppable.", } local fontSize = 32 local font = loadFont('Play', fontSize) local layer = createLayer() local y = fontSize + 16 for i, line in ipairs(lines) do addText(layer, font, line, 16, y) y = y + fontSize + 2 end Bouncy Ball Demonstrates usage of both one-time initialization for local persistent data, as well as requestAnimationFrame(), to draw a moving ball that bounces off the edges of the screen. local resX, resY = getResolution() local dt = 100 * getDeltaTime() -- initialize ball position once if not init then init = true ball = {} ball.x = resX * math.random() ball.y = resY * math.random() ball.vx = 2 * math.random() - 1 ball.vy = 2 * math.random() - 1 ball.radius = math.min(resX, resY) / 8 end -- animate ball position ball.x = ball.x + ball.vx * dt ball.y = ball.y + ball.vy * dt if ball.x < ball.radius or ball.x > (resX-ball.radius) then ball.x = ball.x - ball.vx * dt ball.vx = -ball.vx end if ball.y < ball.radius or ball.y > (resY-ball.radius) then ball.y = ball.y - ball.vy * dt ball.vy = -ball.vy end -- render local layer = createLayer() addCircle(layer, ball.x, ball.y, ball.radius) requestAnimationFrame(1) -
Lua Screen Units API and Instructions (Updated: 19/07/2021)
NQ-Deckard replied to NQ-Deckard's topic in General Discussions
Technical Details How to use Properties Different shapes support different properties that can be set to alter various aspects of the rendering of the shape. The current properties are: fillColor - the interior color of the shape rotation - the angular orientation of the shape about its center shadow - the shadow of the shape strokeColor - the color the border around the shape strokeWidth - the size, in pixels of the border around the shape; negative values produce an interior border, while positive values produce an exterior border The current API design requires that these properties are set before adding the shape, so that, for example, rendering a red rectangle looks as follows: local layer = createLayer() setNextFillColor(layer, 1, 0, 0, 1) -- red with 100% alpha addBox(layer, 0, 0, 16, 16) When you set a property, it does not persist. Thus, to render many red rectangles, you must call setNextFillColor each time. Note that every shape rendering command consumes all properties for that layer even if the shape does not support them. This is for safety and to ensure that the global state does not impact your script in confusing ways. For example, although images do not currently support a stroke color or width, if you call setNextStrokeWidth before addImage, the stroke width will be reset to the default after the call to addImage. Consult the above API specifications to learn which properties are supported for which shapes. Shape Render Order When you need explicit control over the top-to-bottom ordering of rendered elements, you should use layers. As stated in the createLayer() API documentation, each layer that is created within a script will be rendered on top of each previous layer, such that the first layer created appears at the bottom, while the last layer created appears at the top. Shapes that live on the same layer do not offer as much control. Among the same type of shape, instances rendered later will appear on top of those rendered before. So if you add two boxes to a layer, the last box added will appear on top. However, the situation is more complex when mixing different shapes. For efficiency, rendering happens in batches, so that all instances of a given shape on the same layer are drawn at the same time. This means, in general, that all instances of one shape will appear below or above all instances of other shapes, regardless of the relative order in which they were added to the layer. Currently, the ordering is as follows, from top to bottom: addText() -- Top addQuad() addTriangle() addLine() addCircle() addBoxRounded() addBox() addImage() -- Bottom Thus, all boxes will always render below all circles on the same layer, and text on the same layer will appear on top of both. It is not possible to control this behavior, nor is it a good idea to rely on it, as it is subject to change in the future. If you need to rely on something appearing in front of something else, you should probably use multiple layers. (There is currently a maximum of 8 layers) Render Cost Limitations Since render script is intended to solve screen unit performance problems, we impose relatively harsh restrictions on content compared to HTML. This does not mean you won’t be able to create amazing, detailed, high-framerate screen contents – it simply means that you’ll need to be aware of the budgeting mechanism. Any render script call that draws a shape (box, circle, line, text..) adds to a hidden ‘cost’ metric, that consumes some of the screen’s total rendering budget. The details of how this cost is computed are beyond the scope of this document, and it is likely that they will undergo changes in the future as we learn how to best optimize this technology. Roughly-speaking, however, the render cost incurred by any shape is proportional to the screen-space area of the shape, plus a constant factor. This means that a box of dimension 16 x 16 consumes roughly four times as much render cost as a box of 8 x 8 . This is fairly intuitive when you realize that the number of pixels filled by the larger box is, indeed, four times that of the smaller box. Note that four times is not exact, as we neglected to consider the constant factor, but it is close enough. For most render scripts, it is unlikely that the maximum cost will ever be exceeded, so most users probably don’t need to worry too much about this mechanism. However, drawing lots of large text or lots of large, overlapping images, may cause you to exceed the budget. If you wish to dig deeply into this mechanism, you can do so using the built-in API calls getRenderCost() and getRenderCostMax(). getRenderCost() can be called at any point during a render script to see how much all the contents added so far costs. You can use this function to profile the specific cost of specific shapes, if you wish. It is easy enough to draw a render cost profiler on top of your screen to help you understand this mechanism. You can add this snippet at the end of your script to do so (you may need to adjust the text’s fill color if your background is a light colour): -- render cost profiler if true then local layer = createLayer() local font = loadFont('Play-Bold', 14) setNextFillColor(layer, 1, 1, 1, 1) addText(layer, font, string.format('render cost : %d / %d', getRenderCost(), getRenderCostMax()), 8, 16) end Coordinate Space All render script coordinates are in screen pixels, ranging from (0, 0) at the top-left of the screen, to (width, height) at the bottom-right. The width and height of the screen in pixels can be retrieved by calling getResolution(). For maximal robustness, and the ability to fit different aspect ratios, scripts should be written so as to adapt to the resolution using getResolution(). Control Units and Synchronization It is important to know that screen unit Lua runs locally to the player viewing it, this means that dynamic content seen for one player will likely not match what is seen by another player as the two will often be in differing states. For example the bouncy ball example below will not display the ball in the same location for both players viewing the same screen. To achieve similar results for multiple players you can route communication to a screens getInput() which can be interacted with from the control unit side using screen.setScriptInput(). By setting the screen.setScreenInput() from a programming board, we set a string variable (getInput()) for all viewers of the screen unit that will synchronize about once per second. (This is already a considerable amount faster than HTML does currently.) Similarly a screen unit can set an output string variable using setOutput() which can then be read by the programming board using screen.getScriptOutput() to receive data back from the screen. It is important to note that a screens output field is local only, this is a technical limitation for synchronization reasons. The limits of these fields are currently 1024 characters at any given time. Using JSON strings it is possible to send back and forth packets of data to and from the screens for the player running both the control unit and the screen. All other players are limited to the input field only, this allows for one player to "control" the interaction and data exchange between the programming board and screen unit. And all others to use and operate the screen using the screen Lua. An example of how we see this working, would be that the pilot of a ship controls it from the control seat with a screen in front of them which allows them to see various readouts from their ship. Using a mouse they are able to click various interface parts to use the screen to control aspects of their ship. These are relayed back to their control unit using setOutput(). In the meantime fellow crew members are still able to see those readouts animated and moving in real time from their perspective, even if the data they are receiving is only synchronized once per second.- 6 replies
-
- 10
-
-
Lua Screen Units API and Instructions (Updated: 19/07/2021)
NQ-Deckard replied to NQ-Deckard's topic in General Discussions
Render Script Lua API (PTS v1.1) Shapes Squares addBox(layer, x, y, width, height) Add a rectangle to the given layer with top-left corner (x, y) and dimensions width x height. Supported properties: fillColor, rotation, shadow, strokeColor, strokeWidth Rounded Squares (New!) addBoxRounded(layer, x, y, width, height, radius) Add a rectangle to the given layer with top-left corner (x, y) and dimensions width x height with each corner rounded to radius. Supported properties: fillColor, rotation, shadow, strokeColor, strokeWidth Circles addCircle(layer, x, y, radius) Add a circle to the given layer with center (x, y) and radius radius. Supported properties: fillColor, shadow, strokeColor, strokeWidth Images addImage(layer, image, x, y, width, height) Add image reference to layer as a rectangle with top-left corner (x, y) and dimensions width x height. Supported properties: fillColor, rotation Lines addLine(layer, x1, y1, x2, y2) Add a line to layer from (x1, y1) to (x2, y2). Supported properties: rotation, shadow, strokeColor, strokeWidth Quadrilaterals addQuad(layer, x1, y1, x2, y2, x3, y3, x4, y4) Add a quadrilateral to the given layer with vertices (x1, y1), (x2, y2), (x3, y3), (x4, y4). Supported properties: fillColor, rotation, shadow, strokeColor, strokeWidth Text addText(layer, font, text, x, y) Add text to layer using font reference, with top-left baseline starting at (x, y). Note that each glyph in text counts as one shape toward the total rendered shape limit. Supported properties: fillColor Triangles addTriangle(layer, x1, y1, x2, y2, x3, y3) Add a triangle to the given layer with vertices (x1, y1), (x2, y2), (x3, y3). Supported properties: fillColor, rotation, shadow, strokeColor, strokeWidth Layers Creating a new layer createLayer() -> int Create a new layer and return a handle to it that can be used by subsequent calls to the above add shapes. Layers are rendered in the order in which they are created by the script, such that all shapes on layer N+1 will appear on top of layer N. This results in the first created layer being the in the background and the last created layer will be in the foreground. Layers now have a fixed render cost and are no longer limited to 8. Set Screen Background (New!) setBackgroundColor(r, g, b) Set the background color of the screen as red (r), green (g), blue (b) in the range [0, 1] Screen State Functions Get Cursor Coordinates getCursor() -> int, int Return the screen location that is currently raycasted by the player in screen pixel coordinates as a (x, y) tuple. Returns (-1, -1) if the current raycasted location is not inside the screen. Get Cursor Down State (New!) getCursorDown() -> boolean Return true if the mouse cursor is currently pressed down on the screen, false otherwise. Retains its state if dragged out of the screen. Get Cursor Pressed (New!) getCursorPressed() -> boolean Return true if the mouse button changed from being released to being pressed at any point since the last update. Note that it is possible for both getCursorPressed() and getCursorReleased() to return true in the same script execution, if the mouse button was both pressed and released since the last execution. Get Cursor Released (New!) getCursorReleased() -> boolean Return true if the mouse button changed from being pressed to being released at any point since the last update. Note that it is possible for both getCursorPressed() and getCursorReleased() to return true in the same script execution, if the mouse button was both pressed and released since the last execution. Get Delta Time getDeltaTime() -> float Return the time, in seconds, since the screen was last updated. Useful for timing-based animations, since screens are not guaranteed to be updated at any specific time interval, it is more reliable to update animations based on this timer than based on a frame counter. Get Render Cost getRenderCost() -> int Return the current render cost of the script thus far, used to profile the performance of a screen. This can be used to abort further render instructions when close to the render maximum preventing the screen from shutting down. Get Maximum Render Cost getRenderCostMax() -> int Return the maximum render cost limit. When a script exceeds this render cost in one execution, an error will be thrown and the contents will fail to render. Get Resolution getResolution() -> int, int Return the current viewport resolution as a (width, height) tuple. Log Message to Lua Chat (New!) logMessage(message) Write message to the Lua chat if the output checkbox is checked. Loading References Loading Images loadImage(path) -> int? Return an image handle that can be used with addImage. If the image is not yet loaded, a sentinel value will be returned that will cause addImage to fail silently, so that the rendered image will not appear until it is loaded. Only images that have gone through image validation are available. Loading Fonts loadFont(name, size) -> int? Return a font handle that can be used with addText. The font size is size vertical pixels. If the font is not yet loaded, a sentinel value will be returned that will cause addText to fail silently, so that the rendered text will not appear until the font is loaded. A maximum of 8 fonts can be loaded for each render. Name must be one of the following currently-available fonts: FiraMono FiraMono-Bold Montserrat Montserrat-Light Montserrat-Bold Play Play-Bold RefrigeratorDeluxe RefrigeratorDeluxe-Light RobotoCondensed RobotoMono RobotoMono-Bold New: We added monospaced fonts Is Image Loaded (New!) isImageLoaded(imageHandle) -> bool Returns true if the given imageHandle is loaded. Get Text Bounds (New!) getTextBounds(font,text) -> float, float Compute and return the bounding box width and height of the given text in the given font as a (width, height) tuple. Get Font Metrics (New!) getFontMetrics(font) -> float, float Compute and return the ascender and descender height of given font. Animation Request refresh in amount of frames requestAnimationFrame(frames) Notify the screen manager that this screen should be redrawn in frames frames. A screen that requires highly-fluid animations should thus call requestAnimationFrame(1) before it returns. Usage of this function has an obvious and significant performance impact on the screen unit system. Scripts should try to request updates as infrequently as possible for their application. A screen with unchanging (static) contents should not call this function at all. Properties Defaults (New!) Shape Types (New!) For shapeType defaults the following constants are valid: Shape_Box Shape_BoxRounded Shape_Circle Shape_Image Shape_Line Shape_Polygon Shape_Text Set Default Fill Color (New!) setDefaultFillColor(layer, shapeType, r, g, b, a) Set the default fill color for all shapeType on layer. Red (r), green (g), blue (b), and alpha (a) components are specified, respectively, in the range [0, 1]. Has no effect on shapes that don't support the fillColor property. For users who are used to using colors in the range [0, 255] they can simply divide their color by 255 to achieve a [0,1] range. For example: setDefaultFillColor(layer,shapeType, 50/255, 150/255 , 200/255, 255/255) Set Default Rotation in Radians (New!) setDefaultRotation(layer, shapeType, radians) Set the default rotation for all shapeType on layer. Rotation is specified in CCW radians radians. Has no effect on shapes that don't support the rotation property. Set Default Shadow (New!) setDefaultShadow(layer, shapeType, radius, r, g, b, a) Set the default shadow for all shapeType on layer with size radius. Red (r), green (g), blue (b), and alpha (a) components are specified, respectively, in the range [0, 1]. Has no effect on shapes that don't support the shadow property. For users who are used to using colors in the range [0, 255] they can simply divide their color by 255 to achieve a [0,1] range. For example: setDefaultFillColor(layer,shapeType, 50/255, 150/255 , 200/255, 255/255) Set Default Stroke Color (New!) setDefaultStrokeColor(layer, shapeType, r, g, b, a) Set the default stroke color for all shapeType on layer. Red (r), green (g), blue (b), and alpha (a) components are specified, respectively, in the range [0, 1]. Has no effect on shapes that don't support the strokeColor property. For users who are used to using colors in the range [0, 255] they can simply divide their color by 255 to achieve a [0,1] range. For example: setDefaultFillColor(layer,shapeType, 50/255, 150/255 , 200/255, 255/255) Set Default Stroke Width (New!) setDefaultStrokeWidth(layer, shapeType, width) Set the default stroke width for all shapeType on layer. Width is specified in pixels. Positive values produce an outer stroke, while negative values produce an inner stroke. Has no effect on shapes that don't support the strokeWidth property. Properties Set Fill Color for the next shape setNextFillColor(layer, r, g, b, a) Set the fill color of the next rendered shape on layer. Red (r), green (g), blue (b), and alpha (a) components are specified, respectively, in the range [0, 1]. Has no effect on shapes that don't support the fillColor property. For users who are used to using colors in the range [0, 255] they can simply divide their color by 255 to achieve a [0,1] range. For example: setDefaultFillColor(layer,shapeType, 50/255, 150/255 , 200/255, 255/255) Set Rotation for the next shape in Radians setNextRotation(layer, radians) Set the rotation of the next rendered shape on layer. Rotation is specified in CCW radians radians. Has no effect on shapes that don't support the rotation property. Set Rotation for the next shape in Degrees setNextRotationDegrees(layer, degrees) Set the rotation of the next rendered shape on layer. Rotation is specified in CCW degrees degrees. Has no effect on shapes that don't support the rotation property. Set Shadow for the next shape (New!) setNextShadow(layer, radius, r, g, b, a) Set the shadow of the next rendered shape on layer with size radius. Red (r), green (g), blue (b), and alpha (a) components are specified, respectively, in the range [0, 1]. Has no effect on shapes that don't support the shadow property. For users who are used to using colors in the range [0, 255] they can simply divide their color by 255 to achieve a [0,1] range. For example: setDefaultFillColor(layer,shapeType, 50/255, 150/255 , 200/255, 255/255) Set Stroke Color for the next shape setNextStrokeColor(layer, r, g, b, a) Set the stroke color of the next rendered shape on layer. Red (r), green (g), blue (b), and alpha (a) components are specified, respectively, in the range [0, 1]. Has no effect on shapes that don't support the strokeColor property. For users who are used to using colors in the range [0, 255] they can simply divide their color by 255 to achieve a [0,1] range. For example: setDefaultFillColor(layer,shapeType, 50/255, 150/255 , 200/255, 255/255) Set Stroke Width for the next shape setNextStrokeWidth(layer, width) Set the stroke width of the next rendered shape on layer. Width is specified in pixels. Positive values produce an outer stroke, while negative values produce an inner stroke. Has no effect on shapes that don't support the strokeWidth property. Set Text Alignment for the next shape (New!) setNextTextAlign(layer, alignH, alignV) Set the next text alignment for the next rendered shape on layer. alignH controls the horizontal alignment of a text shape relative to the draw coordinates. alignV controls the vertical alignment of a text shape relative to the draw coordinates. alignH must be one of the following built-in constants: AlignH_Left AlignH_Center AlignH_Right alignV must be one of the following built-in constants: AlignV_Ascender AlignV_Baseline AlignV_Top AlignV_Middle AlignV_Bottom AlignV_Descender Note that there is a subtle difference between AlignV_Ascender/AlignV_Descender and AlignV_Top/AlignV_Bottom: the ascender and descender alignment modes anchor a text string to a global top/bottom position of the font, while the top and bottom alignment modes anchor a text string relative to its own bounding box. Thus, while top/bottom are useful for aligning individual text strings with high precision, they depend on the contents of the text string that is rendered. On the other hand, ascender/descender align text in such a way that the alignment will not change depending on the text string. The correct choice will depend on your specific use case and needs. Control Unit Interaction Get Input (New!) getInput() -> string Return a string of input data (or an empty string, if no input has been set) that can be set via a control unit with the screen unit API function screen.setScriptInput(inputString). Set Output (New!) setOutput(outputString) Set the script’s output string to outputString, which can be retrieved via a control unit with the screen unit API function screen.getScriptOutput(). -
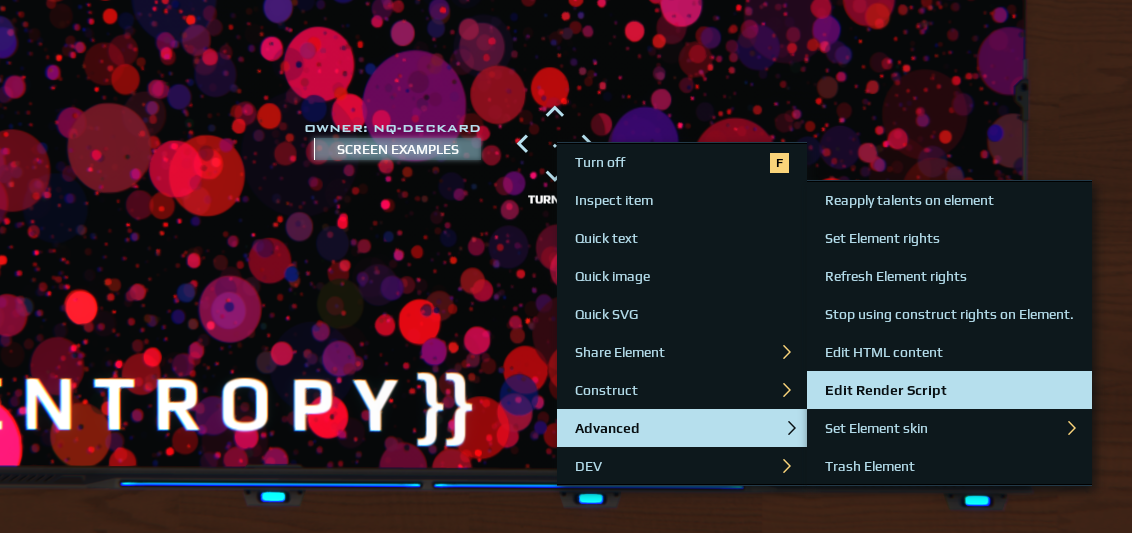
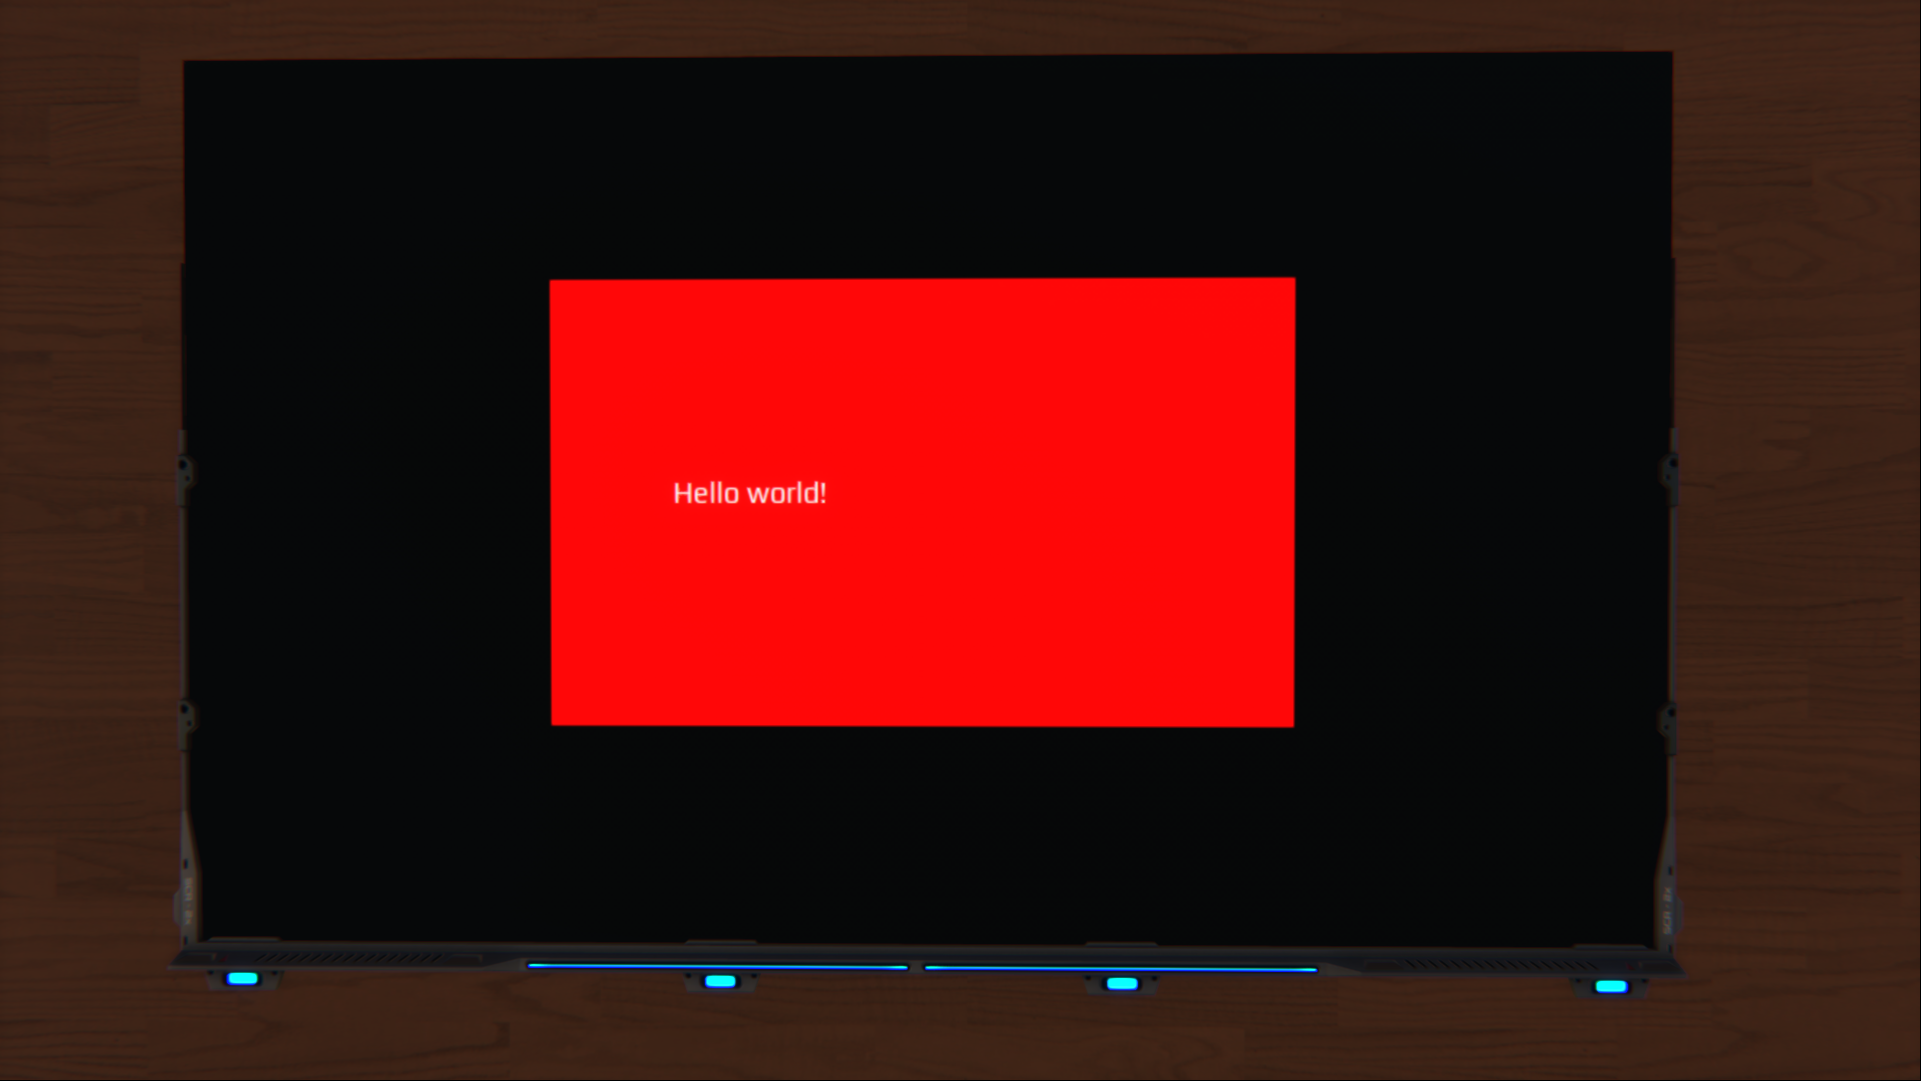
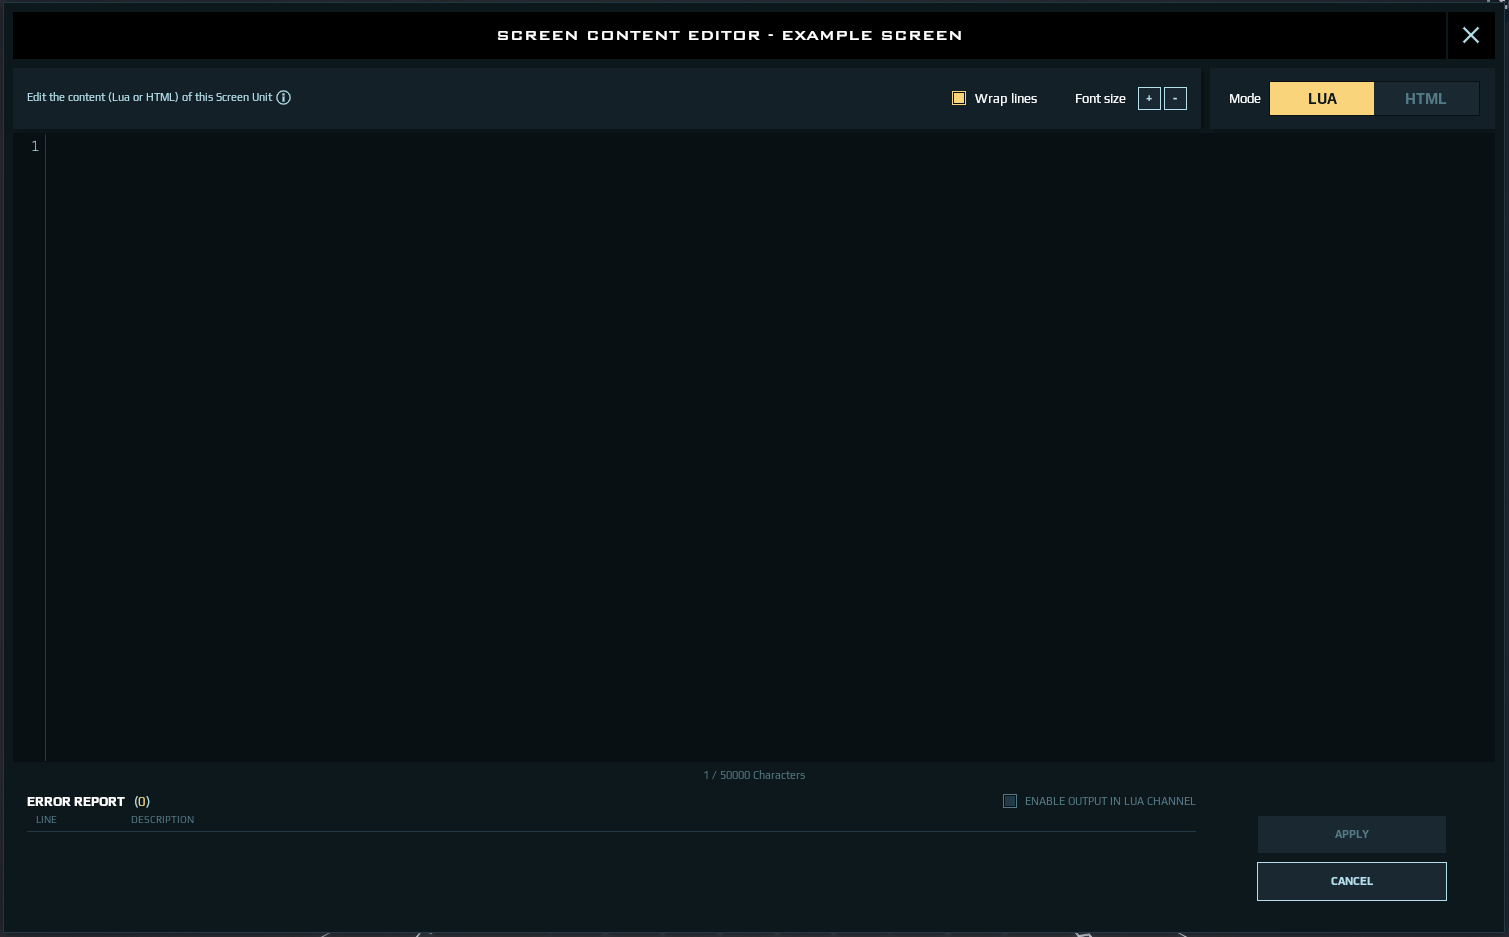
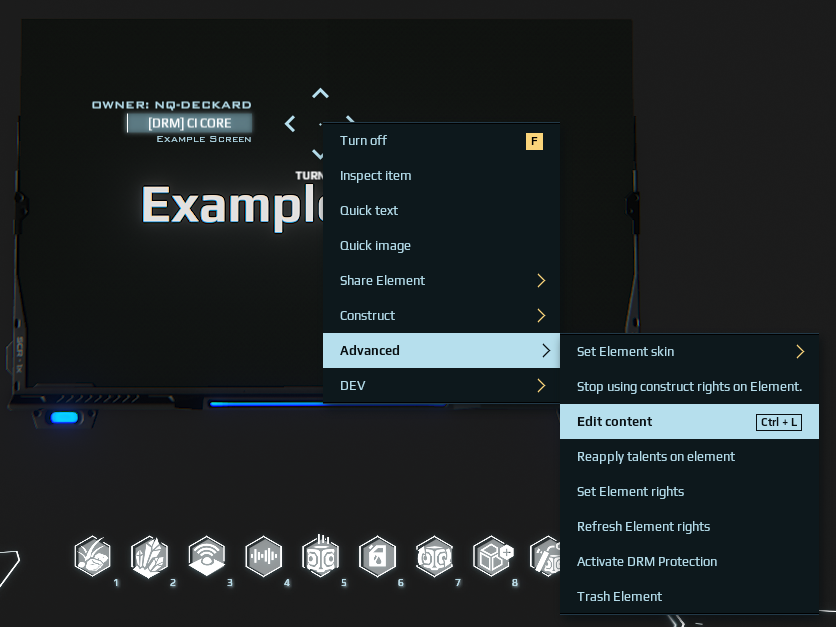
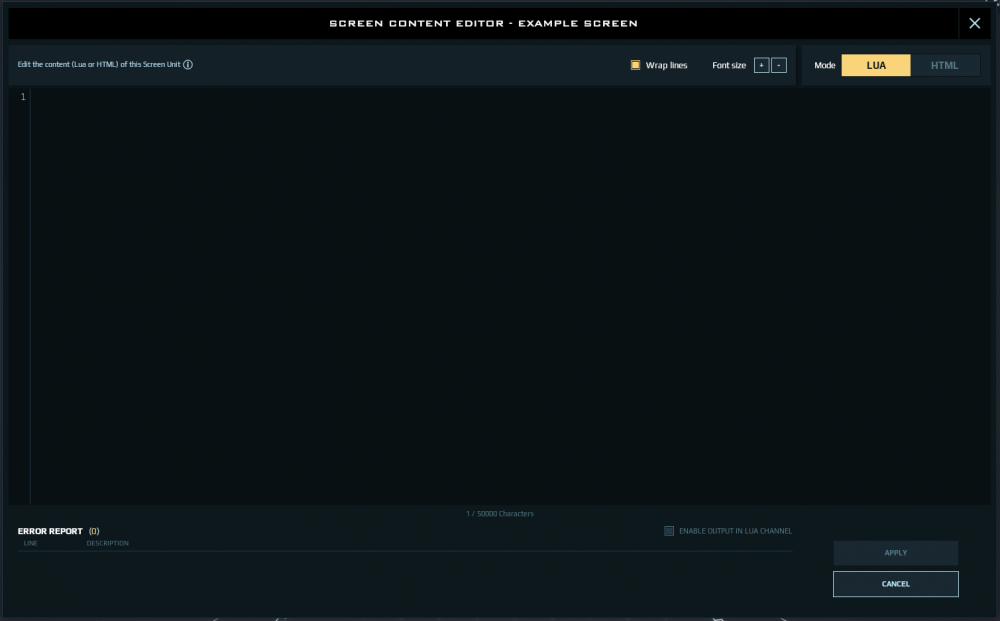
Introduction Updated: 19/07/2021 Lua screen units are a new technology aimed at solving the performance issues associated with our current implementation of HTML on screens, while bringing a new feature allowing complex animations with thousands of graphical elements. Alongside of setting HTML on screen units, it is now possible to set a render script on screen units instead. Render scripts are Lua scripts residing inside the screen units themselves that provide rendering instructions for screen units. Each screen also has a maximum render cost to limit the impact a single screen can have on users that are able to see it, this is important as the impact of a screen is not limited to only the creator of the screen's render script or content but also other nearby players. Inside the render script the content is built up using layers which are rendered on top of each other in order of creation at the end of the render script. After creating a layer, it is then possible to optionally specify a few parameters for the next shape you intend to add to that layer. Such as stroke color, fill color, stroke width and rotation depending on what's available for that shape. Once those parameters are defined we then use "add" functions that draw shapes on those layers using those parameters. If the screen is intended to be a static display there is no further requirement, if you wish for the screen to be animated we can then add: requestAnimationFrame(<frames>) Using this at the end of the script which will aim to refresh the screen after <frames> amount of frames. This should only be used when required for animated content. For performance reasons we recommend not calling this function if no animations are intended to be run. In future we will further expand on this feature to provide more functionality and synergy with control units allowing for far more efficient and responsive screens in the game. Getting Started To start creating renderscripts we start by right clicking the screen and using the context menu option Edit Content (Ctrl+L) to start editing the screen. This will bring up a new Lua & HTML editor window which will allow you to switch between Lua (Render Script) and HTML display modes. In Lua mode it will provide error reporting for the render script in the lower portion of the screen, and to aid in debugging processes there is a check box which will allow you to write to the Lua Channel using logMessage("message") inside the renderscript. This is logging method is local only to you if you have the check box enabled and will be automatically be disabled when the screen is unloaded. Drawing screen contents with render scripts consists of creating one or more layers, on which shapes will be drawn, and then adding shapes to these layers to populate the screen contents. The API currently supports relatively basic shapes: rectangles, circles, lines, triangles, quadrilaterals along with images and text. In the future, we will consider adding more complex shapes as we receive your feedback. Take a look at this basic ‘hello world’ render script: local layer = createLayer() -- Creates a new layer local rx, ry = getResolution() -- Gets the resolution of the screen local font = loadFont("Play", 20) -- Loads the "Play" font at size 20 setNextFillColor(layer, 1, 0, 0, 1) -- Prepares the fill color (Red,Green,Blue,Alpha) for the next shape to be drawn on the layer addBox(layer, rx/4, ry/4, rx/2, ry/2) -- Adds a box shape to layer, starting a 1/4th into the screen, with half the screens width and height addText(layer, font, "Hello world!", rx/3, ry/2) -- Adds a text shape without any properties to layer, using the font, one third from the left, and half way down. This script renders a red rectangle that is half the size of the screen, in the center of the screen, and "Hello World!" on top. Simple!


-
Hello Noveans, We would really like to hear your feedback regarding the Live Support Initiative that we are rolling out. Further information can be found in the DevBlog: Live Support Initiative article. Thank you all for your support!
-
Hello Noveans, Over the past months, we have been working with the Support and Community teams to better identify the wants and needs of our players. These findings have sparked the initiative to implement a Live Support system to address some of the most common issues during peak times as well as address urgent tickets outside of office-hours. In addition, we’re adding some self-help tools that will enable you to resolve some of the most common issues without having to reach out to Support. The changes described below will be included in the next update. NEW TOOLS We are making it easier for players to help themselves in times of need. This is in the form of the following three features, one of which many of you will already be familiar with. Global Chats To better organize and filter the chat within the game, we are implementing the following channels: General - Joined by default and can not be left. Help - Joined by default and can be left. Trade - Can be joined and left. You can interact with these channels by using the following commands in the text window: /join - To join a channel, such as Trade, i.e. “/join Trade”. /help - Lists all available commands. To leave a channel, right-click on the channel tab. We know that global channels have been in high demand from our community, and we’re thankful for that feedback and the opportunity to see them implemented. Please continue to provide feedback about our chat system on our forums. Fetch If you have a dynamic construct that’s become stuck, you can right mouse button-click on the construct from your map view and click to Fetch. This will teleport the construct towards you, allowing you to reach and interact with it normally. We had hoped to be able to make this redundant; however we have seen that there is still a need for it. We are now intending to leave this feature available for the entire duration of beta, initially with these parameters: Players can only fetch once per 24 hours. Maximum range has been limited to 4,000 meters. Players must be standing on a planet/moon’s surface. Unstuck If you find yourself trapped and unable to resume your current play, you can now use /unstuck in chat to free yourself in a random direction. This feature has the following limitations: You can use this command once per five minutes. This teleports you up to 100 meters in a random direction. Teleports can not move players into the building zone of any construct. Please note that the Fetch and Unstuck features are intended to be used only to free stuck constructs and avatars. Any usage outside of this scope may be considered an exploit and actioned accordingly. The team will be continually monitoring the behaviour and results of these features, tweaking when and where needed to ensure that players are not abusing these systems designed to help players in need. LIVE SUPPORT It is important to emphasize that the purpose of Live Support is not to cover all game knowledge questions and assistance scenarios, at least not in this first incarnation. We’ve noticed that many of our community members enjoy helping and teaching other players. We strongly encourage everyone to join our forums where players and organizations can offer further guidance and services to each other. That being said, our Support staff will be monitoring the in-game Help channel for any issues that are eligible for assistance, to offer advice regarding knowledge resources, or to recommend when players should file a Support ticket. Here is a sample of the assistance we may offer: Assistance with the tutorial. Freeing stuck characters (if /unstuck does not work). Raising constructs from below the surface (if Fetch did not work). Fetching ships stuck in the sky above a planet (if Fetch did not work). Refreshing glitched elements. Should you encounter one of these issues, give us a shout out with a description of your issue via @GM in the Help channel. Please allow at least 10 minutes for a response, after which you may choose to file a Support ticket instead. With the implementation of Live Support, we are expecting a significant improvement to response time for urgent inquiries. We are very interested in hearing your feedback and your thoughts about these changes. Please join the discussion here.

-
NEW UPDATE ON THE PTS! The Dual Universe Public Test Server (PTS) is online once more! This time, you can take a look at content from the future 0.25 update. More specifically, what we would like our players to test are the following features: The new voxel storage tech. We proceeded to large, fundamental changes in how voxels are stored server-side, optimizing and improving player bandwidth usage going forward. To test this, it would greatly help us if players could wreak havoc on planets' soils and dig, dig, DIG as much as possible! Three new tutorials are available in the "Tutorials" tab of the VR Station: Gunnery tutorial, RDMS tutorial, and Advanced Construction tutorial. Make sure to visit them during your journey! On a side note, the Screen Unit tech change isn't on the PTS just yet. You'll be able to test that in an upcoming version! You can tremendously help Novaquark by playing on the PTS. Not only will you have a chance to see content that’s in development before it’s released on the Live server, but you’ll also be helping to shape DU through sharing your insights and constructive criticism earlier in the development process. By testing on PTS and sharing your feedback, you will directly help improve DU. On PTS, you have some perks to help you speed up your progress and have an easier time getting the things you need: Dispensers that provide most items for free. A daily allowance of several billion quanta per day. Teleporters at the Market 1 of each major planet, allowing for free teleportation around the universe. For Alioth, the teleporter is located by the dispensers in the Institute District. Three additional teleportation platforms are deployed in space on the edge of the PvP zones Players can respec Talent points at-will. The Fetch feature with no limit of range or cooldown. Feedback and bug reports related to PTS should be posted in this designated forum, which we monitor closely as part of our commitment to improve the quality of the game and its performance. Please note that PTS is solely for testing purposes and may go offline at any time without prior notice. We are doing our best to keep the PTS online as long as possible, but we cannot guarantee that it won't be taken down if we meet a major issue. We’d also like to manage expectations that PTS updates may include feature prototypes and gameplay changes that might not ever come to the Live server. Moreover, there won't be any live Support on the PTS.
-
Hello again Noveans! We have heard your initial feedback on the screens and we want to elaborate on some of your major concerns. Will this affect both screens and content written to the players screen (HUDs)? No, this technological change will affect only screen units at this time. Will all player created work on screens suddenly become non-functional? No, this technology will be available side-by-side with the current technology, both first on the PTS in a prototype state, and eventually also on the Live server. We strongly recommend everyone does test and experiment the new tech on the PTS, as your feedback and testing will help shape this feature. How will this make a difference on performance? The main reason being that the current implementation does not allow for much control over the performance impact of screen renderings. Complex 3D transformations using a combination of HTML, SVG and CSS has a significant impact on render times in the client. Adding to the fact that screens are often condensed with multiples of them in close proximity to each other, there is an increasing drop in performance on the client with more screens using the current technology. The new system allows for more precise control over rendering time allowed across screens and allows us to safeguard the level of performance impact the screens have on the client. So you will be removing HTML support entirely? Not necessarily, the two techs will run side by side for an as of yet undefined period of time. Eventually we may introduce a phase where we make the rendering of HTML on screens an option for players along with a warning that it can significantly degrade client performance. Players with that option disabled will simply not see any HTML content and not suffer performance degradation because of it. Why not improve the current HTML implementation instead of the new technology? This is a complex topic, HTML/CSS/Javascript is a group that forms a UI technology. For reasons beyond the scope of this topic we do not allow the use of Javascript inside the screen units. When you remove Javascript, the group effectively becomes a not so efficient vector image drawing technology which we have very little control over in terms of rendering. We have previously implemented a lot of small limitations here and there to reduce the impact of the screens, but there are (and likely always will be) edge cases which will eventually crop up using that technology. As such, the new technology has built-in limitations on how taxing a screen unit can be, and if a screen unit goes over the limit it will simply stop drawing. This is why we ask you all to go and test this, and help us find caveats and where you run into things you can and can’t do. What about bandwidth? Are you doing this to reduce data transfer for screens? The current implementation does not address this, the current implementation is a way for us to collect your feedback on this concept. Eventually we may change the way data transfer for screens is handled, where we may increase the size of the defined “template” inside a screen unit itself. Followed by a lower limit on the amount of data transferred to the screen from external sources. Allowing the screen element to do the rendering and drawing work, using parameters fed to it by a control unit. For example: You would draw the design of a fancy instrument panel using the screen element, and a programming board or control unit just sends the values for all the instruments to the screen. This is currently not in the current implementation however, but may give you a better idea of why this technology has a lot of potential for more intricate and powerful designs. What about artists who draw using external programs and import their SVG’s into the game? One of our hopes is to provide a good enough set of commands in the screens API so that our system can express most SVG graphics converted to these commands through for example a small conversion tool. It is unlikely that we will develop and maintain a conversion tool for this, but this is also why we want your feedback on this new API for you to let us know what commands you really want to see included to make this process easier. We sincerely hope that this answers many of your initial questions and concerns. I personally can’t wait to see what you will all come up with in your designs!
- 2 replies
-
- 21
-
-
Hello Noveans! Currently, screen unit content is an HTML page. We synchronize screen unit content between players by sending the whole HTML; however, screen unit HTML content can be pretty big and uses a lot of bandwidth and frame time to render when updated every frame by a programming board or control unit. This has a significant impact on client performance for players, especially when a lot of screen units are in the same area. Performance improvement is of paramount importance to us and an ongoing request we get from players. Consequently, it is something we will continually work to achieve. To address this, we are bringing a possible solution to PTS so that players can try it out. This prototype involves using a new API to draw screen units with a dedicated Lua script. This will use simple drawing commands like drawRectangle(a,b,c,d) drawText(“Hello DU”) Simple actions like setTextContent will not be affected. In addition to performance improvements, this new tech also allows for some unprecedented possibilities to create even better screen displays than before. Check out this video to get a taste of what it can do! We realize that this change will mean that players won’t be able to use SVGs on screens anymore, and that SVGs are easier and more flexible than uploading static images. It’s important to note that the new Lua system will still allow you to draw complex images. You don't really need any Lua knowledge, and it’s easier than the DPU system. Additionally, we added an option to deactivate HTML screen units for players who experience the worse framerate. We expect this to bring significant performance improvements in markets and parking areas. Once the change is fine-tuned, thanks to your feedback after trying it on the PTS, we will announce a transition period to allow players time to switch over to the new API before we disable support for HTML-based screen units. We will continue to support both techs during this transition period. We strongly encourage everyone to check out this change when it’s available on PTS and share your constructive feedback with us on the forum.

- 2 replies
-
- 20
-
-
Hello everyone, I see there is some confusion about the rules. To clarify, the safe zone is intended to be a safe zone. If a construct is inside the safe zone, and you do not have the appropriate rights to use it, then leave it alone. If you bring (through any mechanic) bring the construct outside of the safe zone to destroy/capture it, you will get into trouble. It's that simple. Pushing, Manoeuvring, Bumping, Docking, or in any other way moving a construct that does not belong to you, or you do not have the rights for into pvp space is against the rules. It's just common sense, the safe zone is intended to be a safe zone. Period. I hope this clears up any confusion on the topic.